

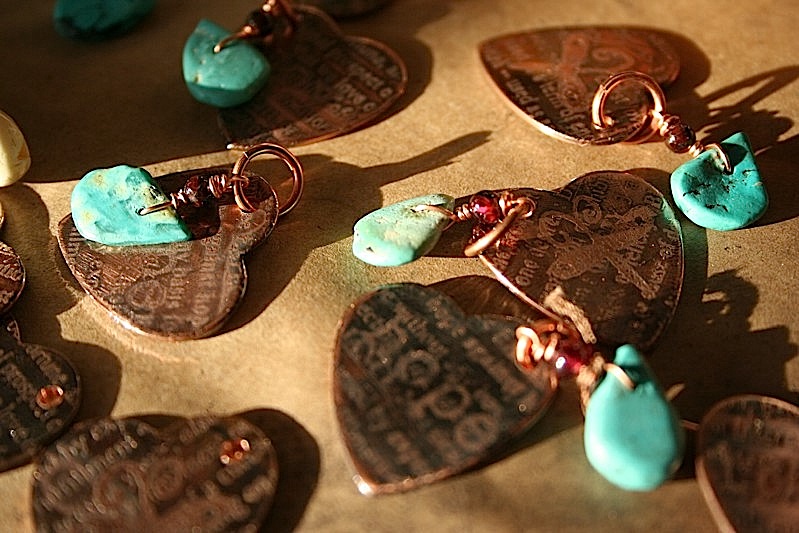
Etched copper Hearts
I wanted my charms to be something easy, because I was going to be making 21 of the 25 charm bracelets but after posting my how to's I see that maybe it was not so easy :)
please note that etching is a trial and era thing ... it does not always work and it does take some practice and the chemicals are hazardous and do require special handling.
MATERIALS:
* "Etchant" (ferric chloride)
* liver of sulphur
* black stazon ink for resist
* glass or plastic container with lid,
big enough to hold piece of metal
* baking soda (bicarbonate of soda)
* fine sand paper, superfine steel wool, or brass brush
* methyl hydrate or isopropyl alcohol
* rubber gloves, plastic tweezers
1. Clean metal to be etched. Should be grease free with no scratches. Final finish should have a slight tooth (ink seems to adhere better than to a highly polished surface), but scratches which are too deep allow the Etchant to get underneath the ink and lift the ink off the surface. An ideal finish is achieved by rubbing with wet 600 Wet & Dry paper (emery or corundum) or scrubbing with wire brush, or superfine steel wool. Scour in a circular motion and rinse under clean water. Surface must be very clean and grease-free.
2. I used rubber stamps and black stazon ink for resist. Where you put ink it will resist the etching action of the chemical. Areas that are left free of ink will etch. The inked areas will remain in relief. remember the DESIGN WILL BE REVERSED. This is important if you are using letters or numbers. Remember to reverse the design. Hold design up to a mirror to check everything is the right way around. allow ink to dry for about 20 minutes.
3. Put etchant in glass or plastic container. Read the label for safety precautions. Submerge piece into Etchant with the design facing down (to allow particles of copper to fall away and not interfere with the etching process). It is best to suspend the piece in the solution, so it is clear of the bottom of the container. Either hang the piece from a wire strung across the container Agitate the solution frequently by gently knocking the edge of the container.
Depending on how much you have used the solution, the piece will be ready in 30 minutes (for new solution) to up to 2 hours (old solution, used many times). For quick action, do not dilute the solution.
4. IMPORTANT: When the piece is etched to the desired depth, remove the piece and wash immediately with water and scrub with an old toothbrush or brass brush and baking soda (or ammonia solution). The baking soda will neutralize the Etchant and stop the etching action. If the Etchant is not completely neutralized, it will continue its etching action.
5. antique with liver of sulphur
2 comments:
I saw these on Flickr, and had to come right over to tell you that they are WONDERFUL!!!!
Just love 'em!
I have been making pendants all day, and was just taking a break, and a lovely break it was thanks to you!!!
These are great Ruth! I love the one on the right with the little dragonfly. I love to etch, that is what I put on the backs of my picture necklaces, etched brass. You know, I pretty much do 2 hours. I like the etch to be very deep. And I use liver of sulphur too because I love the contrast so much. These are really fine and beautiful. I sure wish you lived next door, darn it. We'd have to wear watches, cause we would forget what time it was.
Post a Comment